
What are OpenField Activities?
OpenField Activities are the collection of Periods that encompass a Session's worth of data, such as a Training Session or Match.
How to Load an Activity
- From the OpenField Console Tile Screen, select Start to bring up the Activity Timeline.
- Select Activities to bring up the Activity Menu. Activities are filtered by Date.
- Select the Month, Day, Activity that you would like to open.
How to Create an Activity
- From the OpenField Console Tile Screen, select Start to bring up the Activity Timeline.
- Right click on an empty area in the Activity Timeline, and select New Activity.
- Enter in the Activity Name, Team(s) that you wish to map Athlete's for, Device Type and Day Code.
- Select Create Activity.
Note: You can either fill in the Non-Mandatory fields at this point or Edit after creating the activity. This include the Sport, Venue and field. - The Activity can be made Live if desired. See Recording a Live Activity for more information on how to Record the Activity Live.
Auto Created Activities
An Activity will be created automatically after a Data Transfer, if no activity already exists within 60 minutes of any Downloaded Data.
How to Edit an Activity
- Right click the Activity timeline bar from an open Activity and click Edit Activity.
Activity Timeline Features
To learn more about each button, toggle over the buttons to display more information.
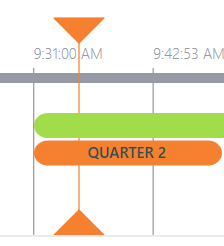
Playerhead
The Playerhead is the vertical orange bar that is perpendicular to the Activity and Period timelines and is only effective when a widget is in Replay Mode. Click and dragging the Playerhead along the Activity timeline will give you accumulative data in a widget for the Activity or Period depending on which viewing mode you are in: Activity, Period or Interval. To toggle between each mode select A - Activities, P - Periods, I - Intervals on the Activity Timeline Features bar.
Viewing Modes: Replay Widget
A - Activity: Select to only display the total cumulative data for an Activity in a widget despite which Period is selected. Moving the Playerhead to any point on the Activity Timeline will give you data for the entire Activity up to where the Playerhead is located regardless of which Activity/Period is selected.
P - Period: Select to displays data for selected Period only or for the entire Activity. To view the total cumulative data for Activity, select the Activity timeline. To view the total cumulative data for a Period, select the Period timeline. Selecting a period moves the Playerhead to the start of that Period and moving the Playhead to the right will give you cumulative data for every point after the start of that period.
I - Interval: Select to divide the selected activity or period into intervals based on the number entered for interval (sec). You can then navigate to a certain interval in the selected Period or Activity by selecting the interval segment from the interval buttons that automatically populate after you enter a interval (sec) time. When you select a Period while in the Interval View, the user is automatically toggled back to Period mode.
Viewing Modes: Live Widget
A - Activity: Select to only display the total cumulative data for an Activity despite which Period is selected.
P- Period: When a Period is selected, the data for each Period is shown in the widget plus data for any period created after it.
Handy Tips
- To move the Activity Timeline left to right, click in any space on the Activity timeline and drag the mouse left or right to move the Activity timeline left or right respectively.
- To zoom in or out, scroll the mouse up or down to zoom in or out respectively.
- To create more vertical space in the Activity timeline area, hover over the back line beneath the Dashboard bar and the Activity Timeline Features bar until a double arrow icon appears. Click and drag to adjust the size.
Related articles